Entertainment Console
This is the big project I was referring to in yesterday's post. We purchased this wood cabinet from a seller on Craigslist. It was the right size and shape we needed for our entertainment center. The price was a steal. I am pretty positive the seller just wanted someone to take this off his hands. Here are a few shots of the cabinet.


After painting the base, we peeled back the tape from the top of the cabinet, but let it hang from the underside the surface so we could catch any stain that would drip.
It looked like this when we finished peeling the tape back.

Using a sponge brush, we applied the stain to the top of the console.


This is how the console looked after the stain had been applied to the top portion.


At first, we thought we would not paint the shelves behind the doors. We ended up changing this later because the patch from that hole on the left side looked so bad from the inside.


After the stain dried, we began the process of applying several coats of polyurethane for protection.

Apply a coat of polyurethane and allow it to dry on the surface. We let ours dry for 24 hours before we moved on to the next step. It may be a little sticky when it dries the first time, that is okay. As long as it is not wet to the touch, if that makes any sense.

For this, we only applied the polyurethane to the top of the piece, however, I have heard of people putting it over painted wood also. We did not do that here, but I will try it on another project someday.


Use a steel wool pad (the #0000 one) to lightly buff the finish once the first coat of polyurethane has dried. This is a tip from my dad, he is pretty experienced with these types of things. Be careful not to rub too hard, or the steel wool will remove some of the stain.

Then, using a rag, wipe the surface to remove any dust particles that may have resulted from the steel wool. Apply another coat of polyurethane to the stained piece. The more times you coat the piece with polyurethane, the more protected your surface will be.

This is how the console looked from a distance.

Then, we reinstalled the doors on the console.
This is how our living room looked before with our previous television stand. All of the additional components for our television were exposed, along with all cords and cables. We wanted something bigger, taller and that had more storage.
It is interesting how one piece of furniture can transform a space. We are quite happy with how this piece changed the look of the entire living room area. The best part of it all is that everything is no longer exposed.
Here is a before and after comparison.


The previous owner had cut a hole on the left side of the piece, I'm guessing for cables and cords. Since we want to camouflage all of our cords, and plan to run them throughout the back of the piece, we wanted to cover this hole.
We used wood filler to seal up the hole on the left side of the piece.
Since we were going to leave it open in the middle and not replace the door, we also used wood filler to cover the holes from the hinges of the middle door.
Since we were going to leave it open in the middle and not replace the door, we also used wood filler to cover the holes from the hinges of the middle door.
This is a solid cabinet, heavy and sturdy, but a bit overwhelming for our living room as is. We wanted to make some changes to it, open it up a bit and change up the color. Golden oak would not fit with our decor.
 |
The first major change was to get rid of the vertical pieces of wood under the middle shelf. These were for holding records. We have no records and therefore no use for the slots. Mr. C took a hammer to them. I'm pretty sure he enjoyed this thoroughly. He jumps at the opportunity to be destructive.
I then removed any remaining nails from the piece with pliers. This was easy by twisting them and kind of rolling them out with the pliers.
Bye bye unneeded boards!
 |
The sides of the middle shelf were exposed. If we wanted to leave the door off the middle section and leave it as an open shelf, this would need to be covered. So we measured the space on either side of that shelf and purchased plywood to fit and created "walls" for the top shelf. Mr. C secured them with his handy dandy brad nail gun.
Here is how it looked after we closed off the sides of the top shelf.
We sanded the entire piece. When we got to the patched portions, we had to sand them so it would become smooth and flush with the rest of the wood.
While Mr. C sanded, I spray painted the hardware and the heads of the screws for the doors. Gold hardware was not going to work for this project.
For this, we used Rust-oleum's Metallic Paint and Primer in One. The color was Carbon Mist.
Once we finished sanding the wooden cabinet completely, we wiped it down with a damp rag to gather all the dust created by sanding.
We used wide width masking tape to tape off the top so the paint color for the base of the piece would not get onto the top. The base paint used was Rust-oleum Painter's Touch Gloss White. It is the same paint used on the desk turned into a vanity project, posted here previously.
We used wide width masking tape to tape off the top so the paint color for the base of the piece would not get onto the top. The base paint used was Rust-oleum Painter's Touch Gloss White. It is the same paint used on the desk turned into a vanity project, posted here previously.
Then, we painted the base. Actually, Mr. C and I each took a side of the console to paint. Teamwork made this part fly by pretty quickly.


Using a sponge brush, we applied the stain to the top of the console.
At first, we thought we would not paint the shelves behind the doors. We ended up changing this later because the patch from that hole on the left side looked so bad from the inside.
Apply a coat of polyurethane and allow it to dry on the surface. We let ours dry for 24 hours before we moved on to the next step. It may be a little sticky when it dries the first time, that is okay. As long as it is not wet to the touch, if that makes any sense.
For this, we only applied the polyurethane to the top of the piece, however, I have heard of people putting it over painted wood also. We did not do that here, but I will try it on another project someday.
Use a steel wool pad (the #0000 one) to lightly buff the finish once the first coat of polyurethane has dried. This is a tip from my dad, he is pretty experienced with these types of things. Be careful not to rub too hard, or the steel wool will remove some of the stain.
Then, using a rag, wipe the surface to remove any dust particles that may have resulted from the steel wool. Apply another coat of polyurethane to the stained piece. The more times you coat the piece with polyurethane, the more protected your surface will be.
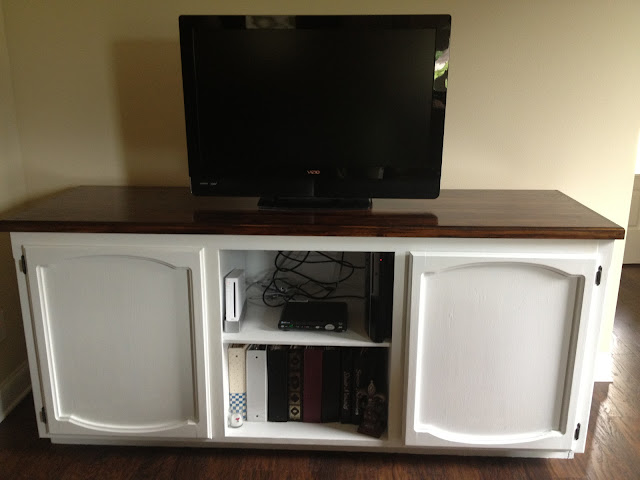
This is how the console looked from a distance.
Then, we reinstalled the doors on the console.
This is the finished product. We are pretty pleased with the results. This entertainment console is much more functional than our old and it has turned into a beautiful piece (if I can say so myself).
This is how our living room looked before with our previous television stand. All of the additional components for our television were exposed, along with all cords and cables. We wanted something bigger, taller and that had more storage.


Comments
Post a Comment